|
New years resolutions are common to make and probably even more common to break. We approach with the best of intentions and then a few days, weeks or months into the process we are often back to our old habits. Why do we fall into these patterns? Are we afraid of the hard work? Are we afraid of change? Maybe not making the resolutions in the first place is the easiest way to not feel like a big old failure at them, right? I think most of us have a dream or goal we always push to the future. We say "maybe someday" or put it in an "if only" category, using something else as the obstacle for why we just can't do or get what we want.
2020 brought a lot of pain and unpredictability, and it couldn't be over soon enough for me. Amongst the uncertainty of this pandemic, health, employment, financial security, etc., I know we can all do our best to take some time our for ourselves. 2021 means change and I say BRING IT!!
0 Comments
I thought it would be fun to share some of the process of a recent piece I created called Turning Japanese. It's a small collection of matching tableware designed with digital papers I created so the piece would be cohesive. The finished piece is seen here. 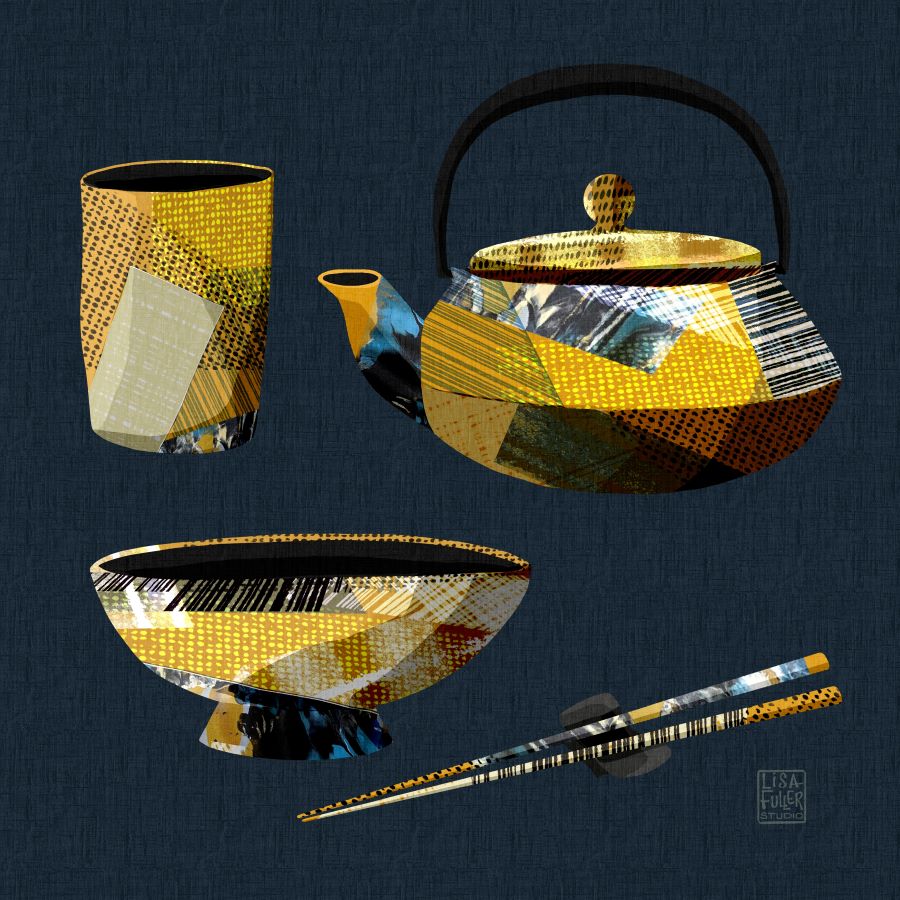 The image below shows a random sampling of some of the textures I created for this piece. They range from dots to parallel lines to cross hatching. There are areas where their overlap can be seen and a new texture is formed. When working digitally, I can also alter the layer mode which changes an element based on what's behind it. An example of this is how the dots on the left are yellow. They turn yellow because of the background color they are on, but it's actually the same texture as the black dots on the right. 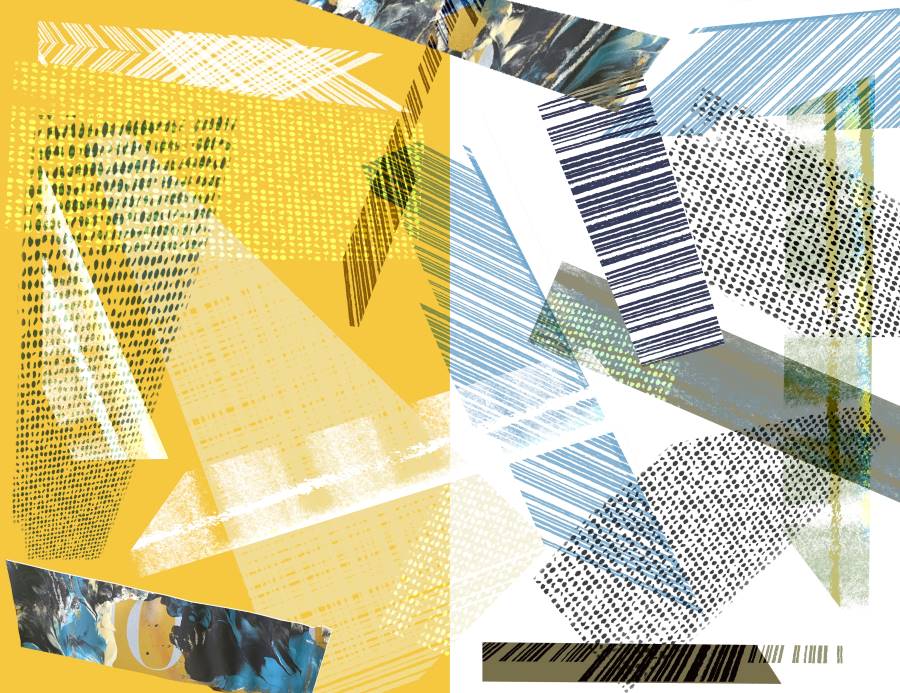 The image below shows one of my favorite types of textures to create, acrylic paints on magazine pages. By using existing pages, I have the benefit of whatever colors, textures and text may be on them straight from the magazine. After adding paint I move it around with a brush, a fork, an old credit card, anything to get interesting shapes and lines happening. I get bursts of colos as they drag and mix through one another. Sometimes I press another page on top and then peel it back again. This removes some of the paint and often leaves some paper behind giving a reverse image. 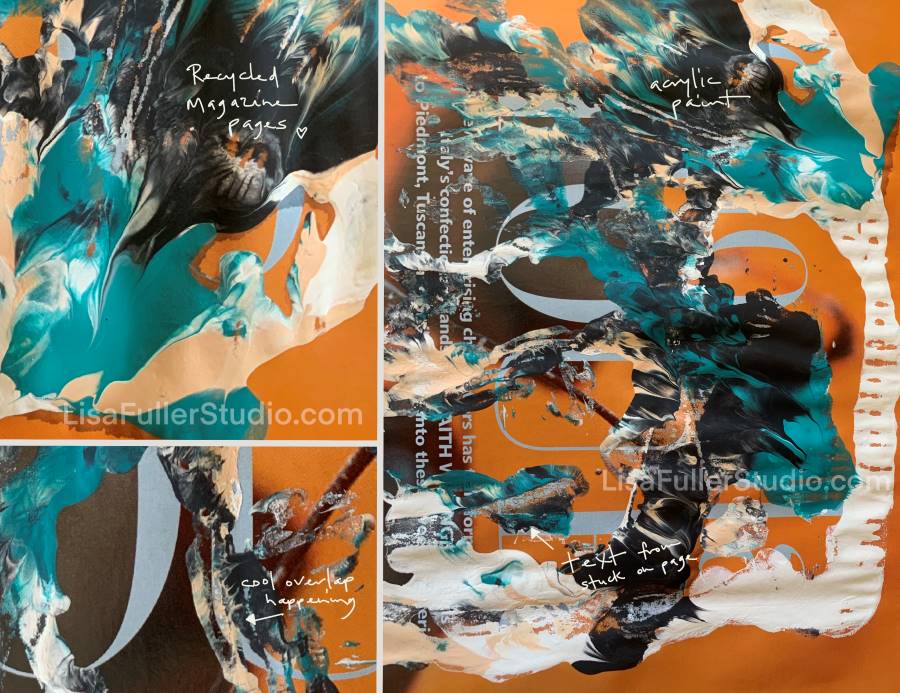 Lastly I will share some stages during creation of the tableware piece. Side by side you can see how the textures created on the left are pulled and layered into the shapes on the right. The teapot shape is first sketched and filled with solid color. Then I choose the positioning of a chunk of the magazine page. The bowl progression shows the general shape design and then the cropping and layering of addition papers to that element. 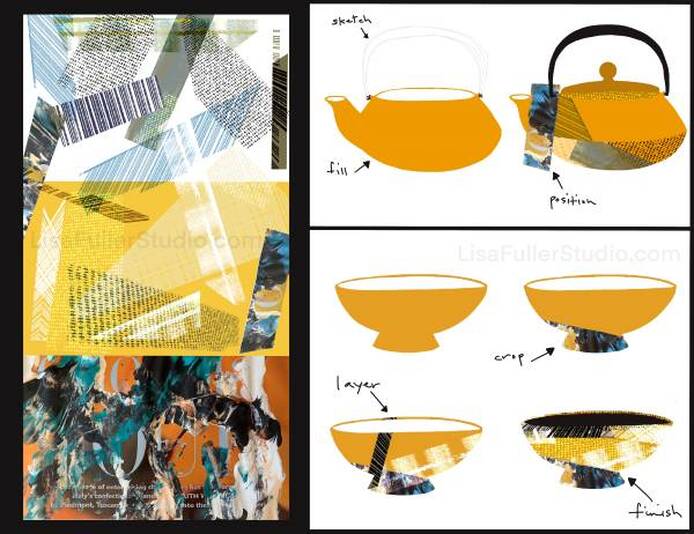 I hope this has been an interesting little peek into my digital collage process. This art piece was kept pretty flat. Usually I go in after filling in the textures and start playing with shapes to add highlights and shadows, but I wanted this one to be very simple.
I enjoy having the freedom to create my own textures and not be limited by only the physical papers I may have on hand as with an analog collage. Having endless digital combinations isn't always a great thing though. With so much freedom to tweak and reposition things, it can be hard to decide which version I like the best. There have been plenty of times where I've worked on a piece for awhile with it looking one way and then I end up changing something major and liking that version better. it's then and only then when my artistic eye is satisfied and I know a piece is truly finished. Thanks for letting my share some of my process with you. :) Lisa I've been trying to decide what my first blog post should be about. Something catchy? Something super informative? Something to draw attention? Blah blah blah. Truly the purpose of my adding a blog to my website isn't so much about being the biggest and the best. It's more about being myself, sharing what inspired me and makes my creative brain tick, what makes my art my own.
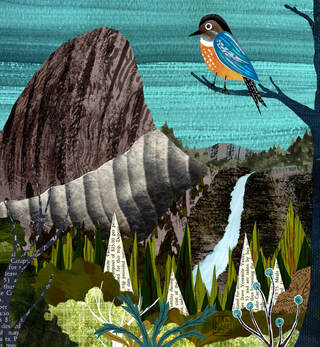
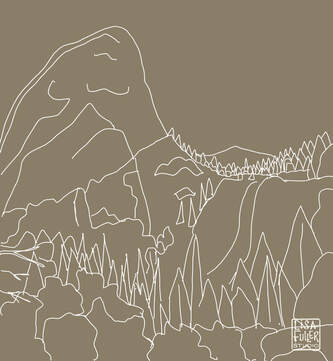
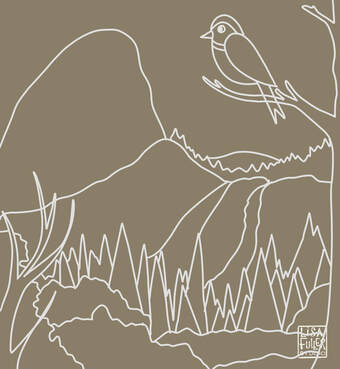
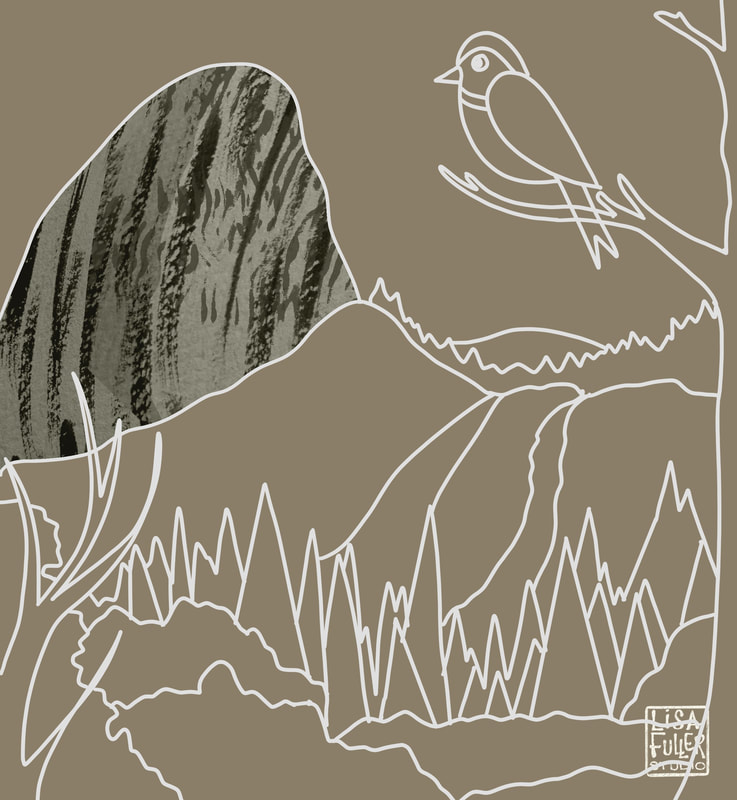
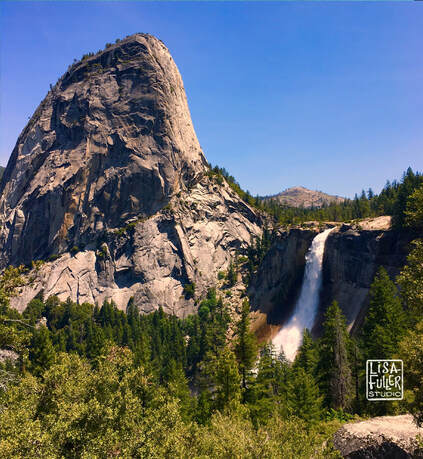 Once I've selected my photo I create a new art file (I use Procreate on my iPad!) and load the photo. Then I create a new layer above the photo and use a light colored pen to trace the general composition. This allows me to capture the shapes and proportions of the elements. 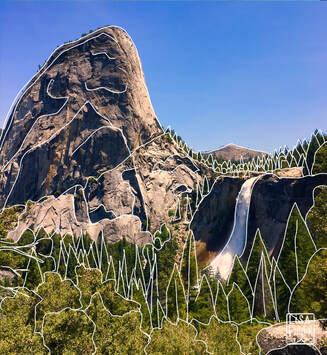 I can then hide the original photo layer and just view the line art I've created. I like to use a neutral background for this process as it's easier on the eyes and allows me to see what I have to work with before committing to a color scheme. At this point I like to clean up the composition by creating a second version of the line art. This allows me to simplify as needed and keep the level of detail I want. Here you can see before and after the line art is simplified. I also added the tree and bird to the foreground for depth.
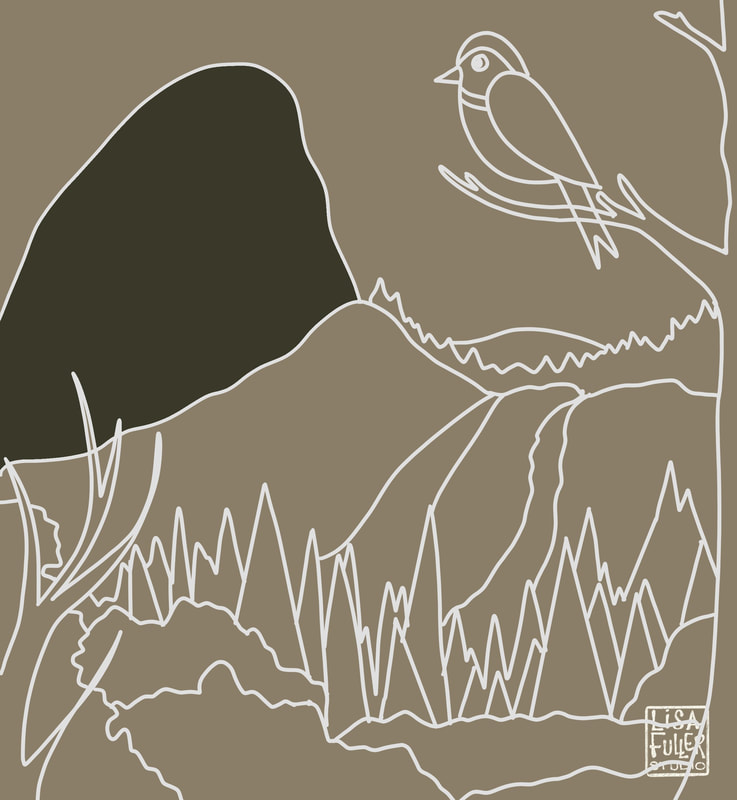
Now I'm ready to start pulling the composition together. Basically each individual section or section of elements gets its own texture(s). Sometimes it's just one, other times it may be several layered in one area at different levels of opacity. I create a new layer and fill in one of the closed spaces with a solid color. Then I reference that layer, add the desired texture layers over it and create a clipping mask so that the texture only shows in the space of the shape.
This process is repeated endlessly until the entire composition is filled. Working in layers can be confusing at times but having each element on its own layer allows me to move things around, change opacity and blend modes, saturation, size, color, order, overlap, etc. It means every element can be individually edited until I'm happy with the finished product. Here is just a small sample of some of the images & textures that were used in this composition. I want to share the individual pieces of the puzzle because I don't think people always understand what goes into a finished piece unless they see the elements laid out in their original form. 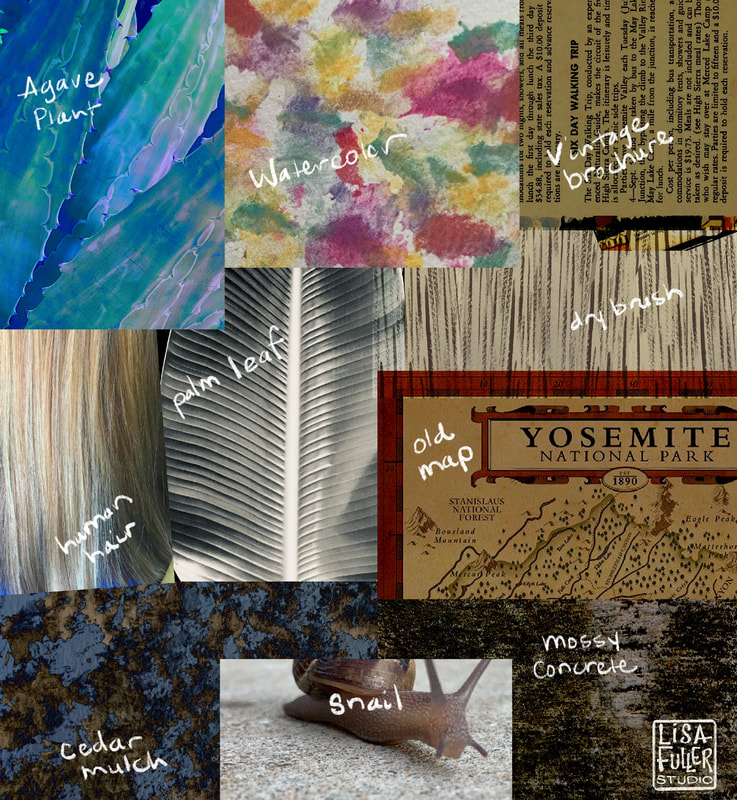 I know the process can sound confusing to someone who's unfamiliar with digital collage and working in layers. It's basically like if you were to draw a picture but you put each element on a different sheet and then stacked them together. Some of those sheets transparent, some solid, some color, some black and white, with a bunch of photos thrown in there to keep things interesting. ;)
I hope this peek into the process has been interesting for you. Comments are welcome! (High five to anyone who can see where my kiddos hair texture was used!) First blog post is now officially in the books! Thanks :) Lisa |
AuthorWelcome to my blog! I am Lisa Fuller, digital collage artist and illustrator. Archives
December 2020
Categories |
 RSS Feed
